

Quick Shed Installation
You’ll be amazed! JDM’s small, specialized lift trucks (called “mules”) and highly trained drivers make short work of shed installation and keep the process clean and simple. Our equipment fits tight spaces, but where access is truly impossible, you can have your shed built on site.
Start with a level site, or level the pad or platform carefully. If the site exceeds 16', use a transit to be sure it is level.
Option One
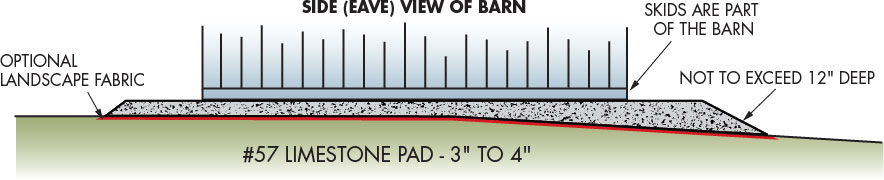
Limestone Bed
A simple foundation, best for level sites. #1 Recommendation. For sites that are fairly level, a layer of limestone is best. Spread limestone in a flat-topped bed, extending it by one foot per side. (For example, a 6'x8' barn needs an 8'x10' limestone bed).
Step 1 — Strip away 3"- 4" of sod OR lay limestone directly on the grass.
Step 2 — Optional: To control weeds, lay landscape fabric on grass or dirt. Fabric must allow water through; DO NOT use plastic, which can encourage rotting.
Step 3 — Spread 3"- 4" of #57 limestone the length and width of the building plus one foot per side. Also include gravel under ramp if using one.
Step 4 (Optional) — You can frame out your limestone pad with 4"x4" treated landscape beams to keep the limestone from spreading.
Option Two
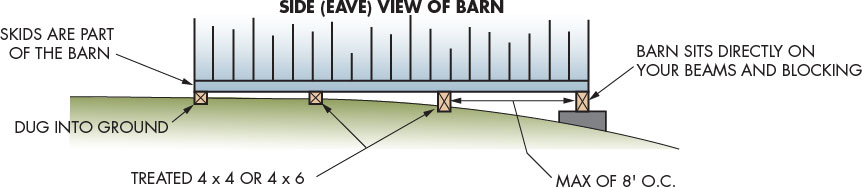
Landscape Beams
For level sites or up to 16" of slope.
Place 4"x4" or 4"x6" treated landscape beams every 8' on center IN THE OPPOSITE DIRECTION of the skids that form the bottom layer of the building’s floor. Skids run in the same direction as the roof ridge. Dig in the landscape beams with 2"-3" above ground level at the highest elevation.
Option Three
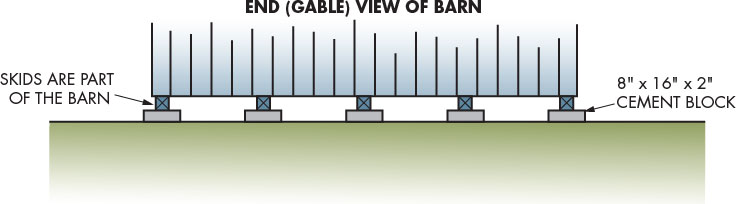
Concrete Block Foundation
For level or sloped sites
To build on concrete blocks, place 8"x16"x2" concrete blocks below the skids. Every skid needs a block at the front and the back. Place additional blocks in the middle, not more than 8' apart. Please call for skid placement.
Option Four
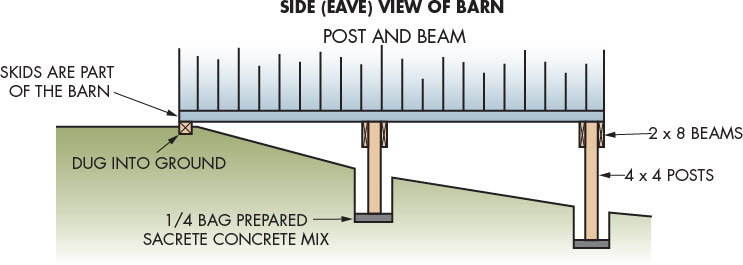
Post and Beam
For sloped sites with up to 4' drop
You can build a post and beam foundation with treated 2"x8" beams attached to posts. The 2"x8" beams must run IN THE OPPOSITE DIRECTION of the skids that form the bottom layer of the building’s floor. Skids run in the same direction as the roof ridge.
Step 1 — Dig 36" deep post holes at 4'-6' on center; fill with 1/4 of a bag of Sacrete® High Strength or Fast Setting Concrete Mix; lower 4"x4" treated posts into the concrete mix and follow concrete bag directions for setting.
Step 2 — Fasten treated 2"x8" beams to posts.
Option Five

Concrete Pad
Requires a level site and extreme accuracy
You can order a building without a wood floor and install a concrete floor, but the concrete pad must be measured precisely and made slightly smaller than the building. To keep the building dry, the siding must fit over the concrete pad and extend 1" down on all sides. If you want a concrete ramp, it must drop down 1½" - 2" from the top of the pad so the door can open. Because of the precision required, concrete pads should be installed only by skilled professionals.
Step 1 — Call us for precise pad size and door location.
Step 2 — Level the site.
Step 3 — Measure with extreme accuracy for size and squareness.
Step 4 — Pour and level concrete pad to a minimum of 6" above ground level. Do not attach bolts or anchors. We will drill into the concrete, install anchors and attach the building to the concrete pad.
If you are doing shed installation on a concrete pad, we will replace the standard bottom plate with treated plates to protect the walls from moisture wicking up and causing rot.
You are responsible for preparing the site and/or foundation for your building. You can do it yourself or contract with JDM to prepare the site. Our delivery team will build directly on your limestone pad, landscape beams, concrete block, post & beam or concrete pad. Please call if you have questions.
The consumer is responsible for all necessary permits, including but not limited to local zoning and building permits. Caulking and painting are also your responsibility. Not having a level, well-drained site may void your warranty.